

How To Create A Blog In Dream Weaver
 Dreamweaver CS6 provides much better support for WordPress than any previous versions, but you'll still have to set up a local testing environment if you want WordPress files to work on your local computer the way they work on your server.
How does Dreamweaver work with WordPress?
You can create a completely custom dynamic site as complex as a blog with Dreamweaver, but these days most lazy (and smart) designers start with a program like WordPress — and then use Dreamweaver to create or edit the themes that control the design and the posts that are added to the blog.
The templates and themes used in WordPress, Drupal, Joomla!, and other content management systems are all created with XHTML and CSS (combined with more advanced programming that uses PHP). Thus, the same CSS and XHTML skills you can find in the Dreamweaver tutorials on this site (as well as my books and videos) also apply to editing a WordPress theme.
Search the Web and you'll find thousands of themes (also known as templates) for WordPress. Downloading and installing templates is relatively easy, but editing them can get complicated quickly for many different reasons.
First, to view and edit a WordPress blog on your local computer, you will need to set your computer up so that it works like a web server. That's because WordPress generates web pages dynamically by pulling content out of a database and displaying it in a template as it opens the page in a browser. Thus, you have to set up a web server on your computer if you want those pages to display on your computer. That's not as hard as it may seem at first, but it is more complicated than installing Dreamweaver, and you'll need a few programs to make it all work.
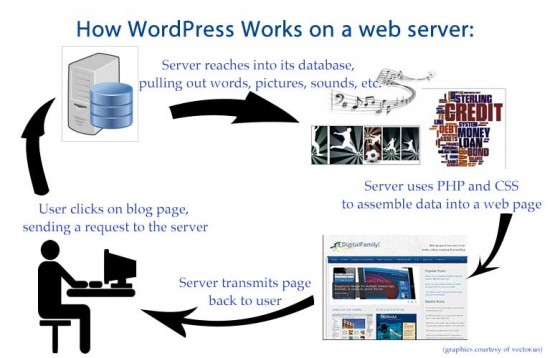
Think of a web server like a super-fast clerk. You click to select "All items about soccer" and the clerk runs around the data warehouse at super-speed, assembling for you a custom book with everything that has anything to do with soccer.
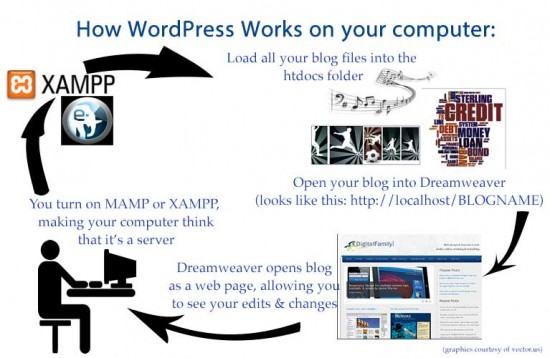
The good news is that you're not alone in facing this challenge and there are a couple of great services that bundle all of the software you need (including the popular Apache web server, MySQL database, and more) into one nice package that you can download and install relatively easily on any desktop computer that is powerful enough to run Dreamweaver.
My favorite software packages for turning your computer into a server with everything you need to run WordPress are:
- ForWindows inXAMPPhttp://www.apachefriends.org/en/xampp.html
- If you use aMac, a popular option isMAMPhttp://www.mamp.info/en/index.html
Don't forget you also need to install WordPress, which you can download for free from WordPress.org.
Once you install all of the software, you need to start the server and other software, and set up a database. I've written instructions on how to do this in this tutorial: How to set up a local web server to edit WordPress with Dreamweaver on your computer
If all goes well, this entire process should take less than an hour, but it's one of those things that can be a bit tricky to get right the first time — fortunately, you only have to do it once and from them on, you'll be all set up to customize and tweak the design template of your blog any time you want on your local computer.
Editing Themes in Dreamweaver
Keep in mind that the WordPress themes you can download from the Web come from many different designers and the CSS may not be written or organized the way you (or I) might prefer if we had designed these templates ourselves. Editing a theme that someone else created is kind of like being your own handyman on a house someone else built.
You don't have to be able to rewire the entire house to replace a light fixture, but you will need to know the basics of how wiring works, and you may need to spend some time studying how the electrician ran the wires, or you risk electrocuting yourself when you start changing things. (To explore the metaphor of how creating a web site or blog is like building a house, read this article.)
Some argue that it's easier to create your own theme than to edit someone else's. At the very least, keep in mind that the first task in editing the CSS in a WordPress theme is often deciphering how the styles are defined and what they do, so you can see where best to make any necessary changes.
If you want to create your own template, or change the programming code that specifies how data is pulled from the database, you'll need to learn a programming language, such as PHP, used in most blogging programs. To help you keep things in perspective, most people can get the hang of XHTML and CSS in a couple of weeks, but many people study programming in a language like PHP for two or more years, although learning just enough PHP to design a WordPress theme can tke a lot less time.
Editing WordPress with Dreamweaver (the easy way)
If you don't want to go to all the trouble of setting up your computer as a server and setting up a local database, you can still use Dreamweaver to design and edit posts for WordPress or to edit the CSS files.
Step-by-step tutorial on how to import your blog's CSS into Dreamweaver
If you just want to edit the CSS files from your blog on your personal computer without having a copy of the entire blog on your hard drive, consider this technique. The technique will vary a bit if your blog is built in Joomla! or Drupal. But the basic steps are the same; we're using WordPress here as an example, since it is far and away the market leader.
- Log into your blog and make sure that you're in the Dashboard view.
- Under "Appearance," click on "Editor." (Depending on your version of WordPress, this may be in a fly-out menu, or you may have to click on Appearance to open up the submenus. If it is the latter, you should probably upgrade your blog to the latest version of WordPress.)
- Find the .css file for your blog. In the picture we've posted here of the back-end of this site, you can see that we're using a rather more complex system of child-and-parent themes. Still, there's a file called "custom.css" over there on the right-hand side. Click on it, and the window in the middle of the screen opens up with all the CSS for your blog.
- Hit CTRL+A to select all the CSS code.
- Open up Dreamweaver, and click File==>New (CTRL+N). When the dialogue box opens up asking you what kind of file you want to create, choose "CSS".
- Hit CTRL+V to paste all of your blog's CSS code into the new Dreamweaver document. Save it using any name you like.
- Open up a browser (we tend to favor Firefox, but Chrome, IE or Safari will all also do this). Open up your blog (the front-end, not the back-end editing Dashboard. We want to work with what the public sees when it goes to your site, OK?).
- Under "Tools," select "Reveal Codes". In Firefox, you can hit CTRL+U, in Chrome it's Alt+CTRL+U.
- This will open up a new tab in which you can see all the HTML code in the page.
- Hit CTRL+A to copy all the HTML.
- Go back to Dreamweaver. Open up a blank HTML page (New==>File==>HTML).
- Hit CTRL+V to paste in all the HTML from your blog.
- Attach the style sheet .css file that you created back in Step 6 to the HTML file.
- Start editing the CSS code, using Dreamweaver to get immediate visual feedback on what you're doing.
- When you're done, copy and paste the CSS code that you've adjusted back into the .css file in your WordPress blog.
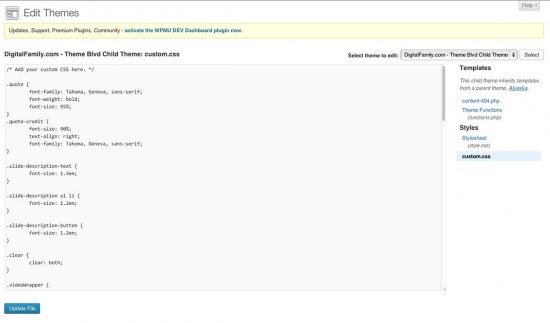
When you open up the "Editor" under "Appearance" in the Dashboard of your WordPress blog, you should get a screen that looks a little like this. The trick is going to be finding where your CSS files that control how your blog looks and behaves are stores. In this case, it's in a file called "Custom.css". As always – your mileage may vary.
With this approach, you get to use all of the great CSS editing tools in Dreamweaver without having to do all of the server setup on your local computer.
Dreamweaver has many great formatting tools for writing, editing, and troubleshooting HTML and CSS — far more than the row of basic formatting choices in the WordPress admin tool. Dreamweaver is especially helpful when it comes to just changing the colors, fonts, and other formatting features in your blog, but you do have to be careful when you copy a CSS file from a WordPress blog into Dreamweaver or vice versa.
Editing WordPress Blog Posts with Dreamweaver
Thanks to copy and paste (one of the oldest tricks on the Web), you can work work on parts of your blog on your personal computer without having a copy of the entire blog on your hard drive.
- Compose your post the way you normally do (either using the Dashboard on your blog, or in an offline text editor, such as MS Word (can be problematic & include garbage code in your posts), TextWrangler, Pages, or whatever you use to write with.
- Use the copypasta technique (also known as the Control-C/Control-V keyboard dance) to import your post into Dreamweaver.
- You can now do fine-tuning and adjustments on your blog post in Dreamweaver, and get immediate visual feedback on your changes, without having to constantly hit "Preview Post" and wait for your blog to upload/download your blog post.
For example, you can change the color that text appears in, you can insert specialized graphics or interactive elements and see how they work, without possible messing up the existing CSS or jQuery/JavaScript that you have on your blog.
change how a wordpress blog looks, customize blog appearance, dwcs3, dwcs4, dwcs5, dwcs6, edit wordpress blog, web design, wordpress
How To Create A Blog In Dream Weaver
Source: http://www.digitalfamily.com/tutorials/how-to-use-dreamweaver-with-wordpress/
Posted by: herreralefterim.blogspot.com
0 Response to "How To Create A Blog In Dream Weaver"
Post a Comment